Enable the Wifi fucntion
- Press and hold the power button for 3 seconds to power on the scanner.
- Press the settings button for 3 seconds.
"Starting" appears on-screen.

- Wait 30-40 seconds for the Wifi to initialize.
"Ready" appears on-screen once the Wifi mode is enabled and ready for connection.
Connect to the scanner
- Go to the network settings on your computer/smart device and enable its Wifi function.
- Search for the IRIScan network and connect to it.
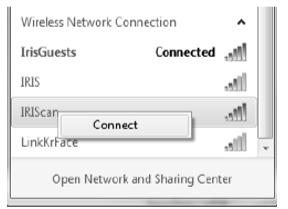
Example from Windows
- When you connect for the first time you are asked for a password. Enter 123456789 to connect to the scanner.
- When the connection is successful, "Connected" appears on-screen.
- Open an Internet browser and enter 192.168.1.2 in the address bar to access the Navigation screen.
- You can now access the scans.
Notes:
- The use of Wifi consumes more battery power. To preserve battery power, it is recommended to turn the Wifi off when you are not using it. To turn off the Wifi press and hold the settings button.
- In Wifi mode you cannot use the scanner to scan documents, unless you are using the Scan Direct function in the IRIScan App.
- When the scanner is in Wifi mode it is not possible to calibrate it. In case you need to calibrate it you need to exit Wifi mode.


David Gillard
Comments