When you scan a document or open an image file in Readiris, each page is divided into recognition zones.
To have them displayed, go to the Zones tab. Readiris uses these zones to determine how each part of your documents must be converted. If your document does not contain any zones, it cannot be recognized.
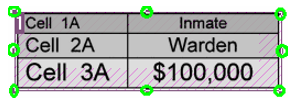
In Readiris Pro there are 3 kinds of recognition zones. You have text zones, image zones and table zones.In Readiris Corporate you can also have a fourth zonetype, being barcode zones.
Notice that each zone type has its own color.
- Text zones: Orange
- Image zones: Purple
- Table zones: Pink
- Barcode zones (Readiris Corporate only): Green.
The zones are also numbered; notice the number in the top left corner of each zone. The numbers run top down and from left to right. They indicate the order in which the zones are recognized. Note: when processing Arabic documents, the numbers run from right to left, if you select Arabic as main language.
Modifying the automatic Page Analysis
The zones we discussed above are displayed when you click the Zones tab. Note however that this automatic page analysis is far from fixed. It can be modified in several ways. For instance, you can manually create new zones, change the zone of existing zones, expand and reduce zones in size, change the sort order, and so on.
To access the Editing and Layout options:
- Scan or open a document in Readiris.
- Click the Zones tab.
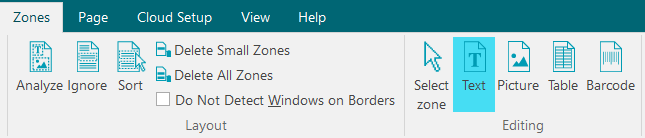
The Editing and Layout options
Below you find an overview of the editing and layout options in Readiris.
Note: when you make any modifications to the layout, Readiris redoes the recognition on the entire page.
Manually drawing zones
In case Readiris missed any recognition zones you can draw them manually.
Note that barcode zones must always be drawn manually.
- In the Editing group, click the zone type you want to create.
- Then click and hold the left mouse button and draw a frame around the section you want to recognize.
Changing the zone type
When scanning bad quality documents, it may occur that Readiris does not determine the zone types correctly. If that happens, know that you can change the zone types manually:
- Right-click the zone you want to change.
- Point to Zone > Type, and then click the zone type of your choice.
Important note: if you are processing bad quality images, Readiris will likely have problems recognizing them correctly. See the topic How do I use the Adjust tool to learn how you can avoid such issues.
Changing the zone type of multiple zones simultaneously
When scanning bad quality documents, it may occur that Readiris does not determine the zone types correctly. If that happens, know that you can change the zone types manually.
- Click Select zone on the Editing group.
- Press and hold the Shift key while clicking the zones you want to modify.
- Then, while still pressing the Shift key, right-click inside a selected zone, point to Zone > Type and click the zone of your choice.
Changing the sort order of zones
The order in which the zones are numbered determines in which order they will be included in the output documents. To change the order:
- Click the Sort button in the Layout group.
The numbers now disappear from the zones. - Now click the recognition zones one by one, in the order you want to sort them in.
Moving zones
- Click Select zone in the Editing group.
- Then click inside the zone you want to move, hold the left mouse button, and drag the frame to the position of your choice.
Connecting zones
Suppose you have two text zones that belong together, and you want to turn them into a single text zone. In that case:
- Select Text in the Editing group.
- Then draw a text zone between the two zones to connect them.
- The two zones are merged into one.
Note that only zones of the same zone type can be connected.
Deleting zones
In case you want to exclude zones from the recognition:
- Click Select zone in the Editing group.
- Then press and hold the Shift key and select the zones you want to delete.
- Right-click one of the selected zones, point to Zone and click Delete.
Deleting small zones
Sometimes documents contain a lot of "noise" - little black spots that occur when scanning low-quality documents or using bad scanner settings. When that is the case, Readiris tends to mark them as recognition zones, even though they do not contain any useful content.
To exclude these zones from recognition:
- Click the option Delete small zones.
- This option erases all windows smaller than 0.5" and re-sorts the remaining zones.
Ignoring zones on borders
When your scanner generates black borders around your documents, Readiris tends to mark them as recognition zones, even though they do not contain any useful content.
In such cases it is recommended to use the option Do Not Detect Windows on borders. That way, the border zones will be excluded from the recognition.
Ignoring a certain zone
In case your document only contains content in a certain area of the page, you can use the Ignore option to exclude the remainder of the page from the recognition.
- Click Ignore in the Layout group.
- Then draw a frame around the section that contains the information. Everything outside the frame will be ignored.
Recognizing the content of a particular zone
In case you only want to recognize the content of a particular text zone, and you don't need a fully converted output document, then you can use the Copy as Text option.
- Right-click the text zone you want to recognize.
- Then click Copy as Text.
The results are copied to the clipboard as body text. You can now paste them into other applications.


Casey King
Comments